[Spring Boot]Spring Security - 2) 회원가입 구현
- -
이전 글에 이어서 본 편에서는 기본으로 제공되는 로그인 기능을 커스텀해서 사용하는 방법을 소개합니다. 그전에 본 글에서는 로그인 유저를 등록하는 회원가입을 먼저 구현하는 내용을 다루고 있습니다. 데이터베이스는 MySQL과 JPA 기술을 이용했습니다.
*여기서부터는 DB를 연결하기 때문에 DB를 먼저 설치해야 합니다.
1. DB 연결
1-1) 디펜던시 추가
build.gradle
//db connection(mysql)
implementation 'mysql:mysql-connector-java'
implementation 'org.springframework.boot:spring-boot-starter-data-jpa'
1-2) DB 접속 정보 설정
application.properties
# jdbc driver
spring.datasource.driver-class-name=com.mysql.cj.jdbc.Driver
# DB 접속 주소
spring.datasource.url=jdbc:mysql://localhost:3306/spring_security?useSSL=false&useUnicode=true&serverTimezone=Asia/Seoul
# DB 계정 정보
spring.datasource.username=root
spring.datasource.password=1234
1-3) 연결 테스트
클래스를 하나 만들어 연결에 성공하는지 간단히 테스트해보자.
package com.app.springsecurity.config;

import org.junit.jupiter.api.Test;

import java.sql.Connection;
import java.sql.DriverManager;

public class DatabaseConfigTest {

    static {
        try {
            Class.forName("com.mysql.cj.jdbc.Driver");
        } catch (Exception e) {
            e.printStackTrace();
        }
    }

    @Test
    public void testConnection() {
        try (Connection con =
                    DriverManager.getConnection(
                            "jdbc:mysql://localhost:3306/spring_security?serverTimezone=Asia/Seoul",
                            "root",
                            "1234")) {
            System.out.println("DB Connection => " + con);
        } catch (Exception e) {
            System.out.println(e.getMessage());
        }
    }
}
2. 회원가입 구현
2-1) Entity 생성
로그인을 하기 위해서 먼저 회원을 추가하는 기능을 만들어보려한다.
테이블 구조는 다음과 같다.
테이블명 : USER_INFO
- USER_ID : 사용자 아이디 / VARCHAR(45) / NOT NULL / PK
- USER_PW : 패스워드 / VARCHAR(256) / NOT NULL
- USER_NAME : 이름 / VARCHAR(20)
package com.app.springsecurity.user.repo;

import lombok.Builder;
import lombok.Data;
import lombok.NoArgsConstructor;

import javax.persistence.Entity;
import javax.persistence.Id;

@Data
@Entity(name="USER_INFO")
@NoArgsConstructor
public class UserEntity {
    @Id
    private String userId;
    private String userPw;
    private String userName;

    @Builder
    public UserEntity(
            String userId,
            String userPw,
            String userName) {
        this.userId = userId;
        this.userPw = userPw;
        this.userName = userName;
    }
}
2-2) DTO 생성
Entity 클래스는 테이블 컬럼과 직접 매핑되기 때문에 Controller - View 통신에 필요한 DTO는 따로 분리해줬다. 여기에는 여러가지 이유가 있지만 가장 큰 이유는 용도의 차이이다. DTO는 Controller와 View간의 데이터 요청/응답을 위한 용도로 변경이 빈번하게 발생할 수 있지만 Entity는 테이블과 직접 연관이 되어있기 때문에 변경된다면 끼치는 영향이 크다. 따라서 두 클래스는 구분해주는 것이 좋다.
package com.app.springsecurity.user.dto;

import com.app.springsecurity.user.repo.UserEntity;
import lombok.Data;

@Data
public class UserDTO {

    private String id;
    private String password;
    private String name;

    public UserEntity toEntity() {
        return UserEntity.builder()
                .userId(id)
                .userPw(password)
                .userName(name)
                .build();
    }
}
2-3) Repository 생성
package com.app.springsecurity.user.repo;

import org.springframework.data.jpa.repository.JpaRepository;
import org.springframework.stereotype.Repository;

@Repository
public interface UserRepository extends JpaRepository<UserEntity, String> {

}
2-4) Service 생성
package com.app.springsecurity.user.service;

import com.app.springsecurity.user.dto.UserDTO;
import com.app.springsecurity.user.repo.UserRepository;
import lombok.AllArgsConstructor;
import org.springframework.security.crypto.password.PasswordEncoder;
import org.springframework.stereotype.Service;

@Service
@AllArgsConstructor
public class UserService {

    private UserRepository userRepository;
    private PasswordEncoder passwordEncoder;

    public String saveUser(UserDTO userDTO) {
        //패스워드 암호화
        userDTO.setPassword(passwordEncoder.encode(userDTO.getPassword()));
        userRepository.save(userDTO.toEntity());
        return userDTO.getId();
    }

}
화면에서 넘어온 패스워드를 암호화하는 로직을 추가했다. 암호화 알고리즘을 직접 작성해 적용해도 되지만 여기서는 스프링 시큐리티에서 제공해주는 PasswordEncoder를 이용했다. PasswordEncode를 사용하기 위해 Config 클래스를 하나 생성하고 Bean으로 등록해준다.
생성한 Config 클래스에는 이후에 Security의 설정들이 추가로 들어갈 예정이다. 그리고 미리 회원가입 페이지(join)와 회원가입 기능(user/join)에 대한 권한 체크를 풀어줬다. => permitAll()
package com.app.springsecurity.config;

import lombok.extern.slf4j.Slf4j;
import org.springframework.context.annotation.Bean;
import org.springframework.context.annotation.Configuration;
import org.springframework.security.config.annotation.web.builders.HttpSecurity;
import org.springframework.security.config.annotation.web.builders.WebSecurity;
import org.springframework.security.config.annotation.web.configuration.EnableWebSecurity;
import org.springframework.security.config.annotation.web.configuration.WebSecurityConfigurerAdapter;
import org.springframework.security.crypto.factory.PasswordEncoderFactories;
import org.springframework.security.crypto.password.PasswordEncoder;

@Slf4j
@Configuration
@EnableWebSecurity
public class SecurityConfig extends WebSecurityConfigurerAdapter {

    @Override
    public void configure(WebSecurity web) throws Exception {
        //static 하위 파일은 인증 대상에서 제외
        web.ignoring().antMatchers("/css/**");
        web.ignoring().antMatchers("/favicon.ico");
    }

    @Override
    protected void configure(HttpSecurity http) throws Exception {
        log.info("======================================");
        log.info(">> Run on Spring security");
        log.info("======================================");

        http.authorizeRequests()
                .antMatchers("/join").permitAll()
                .antMatchers("/user/join").permitAll()
                .anyRequest().authenticated();
    }

    @Bean
    public PasswordEncoder passwordEncoder() {
        return PasswordEncoderFactories.createDelegatingPasswordEncoder();
    }
}
2-5) Controller 생성
package com.app.springsecurity.user.controller;

import com.app.springsecurity.user.dto.UserDTO;
import com.app.springsecurity.user.service.UserService;
import lombok.AllArgsConstructor;
import org.springframework.web.bind.annotation.PostMapping;
import org.springframework.web.bind.annotation.RestController;

@RestController
@AllArgsConstructor
public class UserController {

    private final UserService userService;

    @PostMapping("/user/save")
    public String saveUser(UserDTO userDTO) {
        return userService.saveUser(userDTO);
    }

}
2-6) 회원가입 화면 생성
스프링 시큐리티는에서는 csrf 토큰기반의 인증 기능을 제공하는데 설정을 따로 하지 않는다면 자동으로 활성화되어 HTTP 요청인 POST, PUT, PATCH, DELETE 마다 발행된 토큰이 요청에 포함되어 있는지 체크한다. 따라서 회원가입을 하게 되면 POST 요청에 의해 토큰이 없는 경우 403 에러가 발생하게 된다.
해당 에러를 방지하기 위해서는 Thymeleaf th 태그를 이용하면된다. csrf 토큰이 자동 생성되는 것을 확인할 수 있다.
<!DOCTYPE html>
<html xmlns="http://www.w3.org/1999/xhtml"
      xmlns:th="http://www.thymeleaf.org">
<head>
    <meta charset="UTF-8">
    <title>회원가입</title>
</head>
<body>
<form method="post" th:action="@{/user/save}">
    아이디 : <input type="text" name="id">
    패스워드 : <input type="password" name="password">
    이름 : <input type="text" name="name">
    <button>가입하기</button>
</form>
</body>
</html>
2-7) 화면을 관리하는 컨트롤러 생성
package com.app.springsecurity;

import org.springframework.stereotype.Controller;
import org.springframework.web.bind.annotation.RequestMapping;

@Controller
public class HomeController {

    @RequestMapping("/join")
    public String join() {
        return "/join";
    }

}
2-8) 테스트

DB를 조회해보면 아래처럼 정상적으로 저장된 것을 확인할 수 있다.

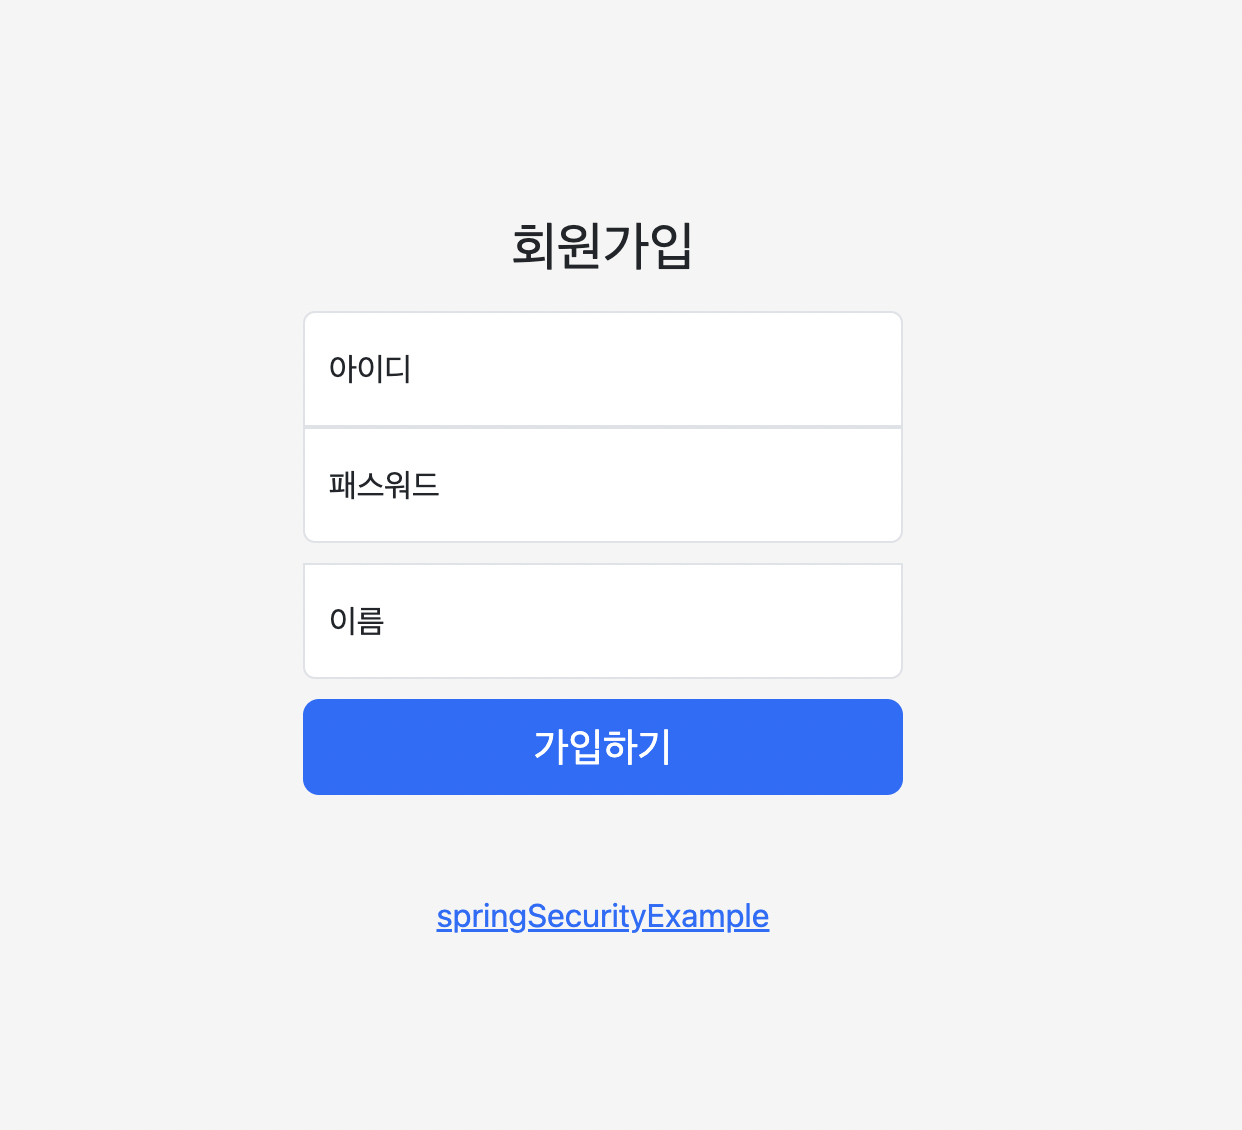
+ 부트스트랩 적용 회원가입 페이지
<!DOCTYPE html>
<html xmlns="http://www.w3.org/1999/xhtml"
      xmlns:th="http://www.thymeleaf.org">
<head>
    <meta charset="UTF-8">
    <title>회원가입</title>
</head>
<body>
<link href="https://cdn.jsdelivr.net/npm/bootstrap@5.3.0-alpha1/dist/css/bootstrap.min.css" rel="stylesheet" integrity="sha384-GLhlTQ8iRABdZLl6O3oVMWSktQOp6b7In1Zl3/Jr59b6EGGoI1aFkw7cmDA6j6gD" crossorigin="anonymous">
<link th:href="@{/css/sign-in.css}" rel="stylesheet">
<style>
    #floatingInput {
        border-bottom-left-radius: 0;
        border-bottom-right-radius: 0;
    }
</style>
<main class="form-signin w-100 m-auto">
    <form method="post" th:action="@{/user/save}">
        <h1 class="h3 mb-3 fw-normal text-center">회원가입</h1>

        <div class="form-floating">
            <input type="text" class="form-control" id="floatingInput" name="id" placeholder="아이디">
            <label for="floatingInput">아이디</label>
        </div>
        <div class="form-floating">
            <input type="password" class="form-control" id="floatingPassword" name="password" placeholder="패스워드">
            <label for="floatingPassword">패스워드</label>
        </div>
        <div class="form-floating">
            <input type="password" class="form-control" id="floatingName" name="name" placeholder="이름">
            <label for="floatingName">이름</label>
        </div>

        <button class="w-100 btn btn-lg btn-primary" type="submit">가입하기</button>
        <p class="mt-5 mb-3 text-center"><a href="https://github.com/eeesnghyun/springSecurity">springSecurityExample</a></p>
    </form>
</main>
</body>
</html>
다음편에서는 저장된 정보를 통해 로그인하는 기능을 추가해보도록 하겠습니다.
전체 소스는 깃허브에서 확인하실 수 있습니다 :)
'Framework > Spring' 카테고리의 다른 글
| [Spring Boot]Redis 사용법 (1) | 2023.02.17 |
|---|---|
| [Spring Boot]Spring Security - 3) 로그인 구현 (1) | 2023.01.17 |
| [Spring Boot]Spring Security - 1) 프로젝트 셋팅 (0) | 2023.01.15 |
| [Spring Boot]Spring Security + Swagger 연동 (0) | 2022.07.31 |
| [Spring Boot]JPA 연동 - 2) 데이터 등록 (0) | 2021.11.04 |
소중한 공감 감사합니다.