새소식
반응형
WAS의 SSL 설정에 이어서 오늘은 아파치 SSL 설정 방법에 대해 포스팅하려 합니다.
현재 환경은 아파치+톰캣 연동을 한 상태이며, 아파치에 SSL 설정을 하였습니다.
순서를 나눠 아파치 SSL 설정 글과 SSL 설정이 된 아파치+톰캣을 구동하는 방법을 정리하였습니다.
SSL에 대한 설명은 이 글을 참고해주세요.
아파치 설치는 이 글을 참고해주세요. 아파치(SSL 설정)+톰캣을 원하시는 분은 글의 전체를 따라해주시면 되며,
아파치(SSL설정)만을 원하시는 분은 글의 아파치 설치까지만 따라해주시면 됩니다.
※ 테스트 환경입니다.
아파치 SSL 설정
먼저 SSL 설정을 하기 위해 인증서와 키가 필요하다.
아파치를 설치해보면 bin(Apache24 - bin)이라는 폴더에 openssl.exe라는 프로그램이 보인다.
이것을 이용해 테스트용 인증서와 키를 만든다.
커맨드창을 열어 Apache24(아파치가 설치된 경로) - bin 에 접속한다.

openssl req -config C:\Apache24\conf\openssl.cnf -new -out localhost.csr
인증서 서명 요청(Certificate Signing Request)파일을 만든다.
여기서 C:\Apache24\conf\openssl.cnf 는 openssl.cnf 파일이 있는 경로를 가르킨다. 기본적으로 openssl.cnf 파일은 아파치 폴더 conf 폴더에 위치한다.

명령어가 실행되면 위와 같이 privkey.pem이라는 개인키가 생성된다.

개인키의 비밀번호를 입력한다.(4자리 이상)


입력하지 않고 넘어가도록 한다.

openssl rsa -in privkey.pem -out win_privkey.pem
생성된 개인키를 윈도우용 개인키로 변환한다.
openssl rsa -in win_privkey.pem -out localhost.key
.key 파일로 변환한다.
openssl x509 -in localhost.csr -out localhost.crt -req -signkey localhost.key -days 365
crt 인증서를 만든다.

httpd.conf
LoadModule socache_shmcb_module modules/mod_socache_shmcb.so
#LoadModule speling_module modules/mod_speling.so
LoadModule ssl_module modules/mod_ssl.so
#LoadModule status_module modules/mod_status.so
#LoadModule substitute_module modules/mod_substitute.so
ssl_module modules/mod_ssl.so 주석을 풀어준다.(174~178 라인쯤)
</IfModule>

# Secure (SSL/TLS) connections
Include conf/extra/httpd-ssl.conf

#
httpd-ssl.conf 파일의 include 주석을 풀어준다.(526~530 라인쯤)
httpd-ssl.conf
Listen 443아파치 SSL 설정시 기본포트는 443이다.(35 라인쯤)
기본 설정들에서 사용하고자 하는 옵션의 주석을 풀면서 사용해주면 된다.
참고로 설정시 기호를 사용할 수 있는데 기호에 의미는 다음과 같다.
SSLProtocol all +TLSv1.1 +TLSv1.2 +TLSv1.3
SSLProxyProtocol all +TLSv1.1 +TLSv1.2 +TLSv1.3
해당 옵션은 아파치 버전과 openssl 버전에 따라 에러가 발생할 수 있다고 한다.(78~79 라인쯤)
(권장 : 아파치 2.4, openssl 1.0.1 이상)
#SSLPassPhraseDialog  builtin
SSLPassPhraseDialog  exec:C:\Apache24/conf/ssl_passwd.bat
이 부분때문에 꽤나 고생했다..(85~87 라인쯤)
이 옵션은 1)에서 생성한 개인키의 암호를 설정해주는 부분이다.
아파치 SSL 설정시, 서버를 구동하게 되면 내부적으로 개인키 패스워드를 묻게 된다. 따라서 1)에서 개인키 생성시 암호 설정을 했다면 이 옵션을 반드시 추가해주어야 한다.
에디터를 열어 conf 경로에 배치파일을 생성한다.(ssl_passwd.bat) 이 파일을 실행함으로써 패스워드가 자동으로 인증된다.
##
## SSL Virtual Host Context
##

<VirtualHost *:443>

#   General setup for the virtual host
DocumentRoot "${SRVROOT}/htdocs"
ServerName localhost:443
#ServerAdmin admin@example.com
ErrorLog "${SRVROOT}/logs/error.log"
TransferLog "${SRVROOT}/logs/access.log"

#   SSL Engine Switch:
#   Enable/Disable SSL for this virtual host.
SSLEngine on
(117 ~ )
#   Server Certificate:
#   Point SSLCertificateFile at a PEM encoded certificate.  If
#   the certificate is encrypted, then you will be prompted for a
#   pass phrase.  Note that a kill -HUP will prompt again.  Keep
#   in mind that if you have both an RSA and a DSA certificate you
#   can configure both in parallel (to also allow the use of DSA
#   ciphers, etc.)
#   Some ECC cipher suites (http://www.ietf.org/rfc/rfc4492.txt)
#   require an ECC certificate which can also be configured in
#   parallel.
SSLCertificateFile "${SRVROOT}/bin/localhost.crt"
#SSLCertificateFile "${SRVROOT}/conf/server-dsa.crt"
#SSLCertificateFile "${SRVROOT}/conf/server-ecc.crt"

#   Server Private Key:
#   If the key is not combined with the certificate, use this
#   directive to point at the key file.  Keep in mind that if
#   you've both a RSA and a DSA private key you can configure
#   both in parallel (to also allow the use of DSA ciphers, etc.)
#   ECC keys, when in use, can also be configured in parallel
SSLCertificateKeyFile "${SRVROOT}/bin/localhost.key"
#SSLCertificateKeyFile "${SRVROOT}/conf/server-dsa.key"
#SSLCertificateKeyFile "${SRVROOT}/conf/server-ecc.key"

#   Server Certificate Chain:
#   Point SSLCertificateChainFile at a file containing the
#   concatenation of PEM encoded CA certificates which form the
#   certificate chain for the server certificate. Alternatively
#   the referenced file can be the same as SSLCertificateFile
#   when the CA certificates are directly appended to the server
#   certificate for convenience.
#SSLCertificateChainFile "${SRVROOT}/conf/server-ca.crt"

#   Certificate Authority (CA):
#   Set the CA certificate verification path where to find CA
#   certificates for client authentication or alternatively one
#   huge file containing all of them (file must be PEM encoded)
#   Note: Inside SSLCACertificatePath you need hash symlinks
#         to point to the certificate files. Use the provided
#         Makefile to update the hash symlinks after changes.
#SSLCACertificatePath "${SRVROOT}/conf/ssl.crt"
#SSLCACertificateFile none
(135 ~ )
1)에서 생성한 인증서와 키를 추가하는 부분이다.
테스트용임을 가정하고 Server Certificate / Server Private Key 파일을 지정한다.
(인증기관에서 인증서를 구매/발급하게 되면 인증서파일, 루트인증서파일, 체인인증서 파일을 받게 되는데 그 때는 SSLCertificateChainFile / SSLCACertificateFile을 지정해주면 된다)
SSLCertificateFile "${SRVROOT}/bin/localhost.crt"
SSLCertificateKeyFile "${SRVROOT}/bin/localhost.key"
ssl_passwd.bat
@echo 123456123456에 본인이 지정한 패스워드를 입력한다.
아파치를 재구동해보자.
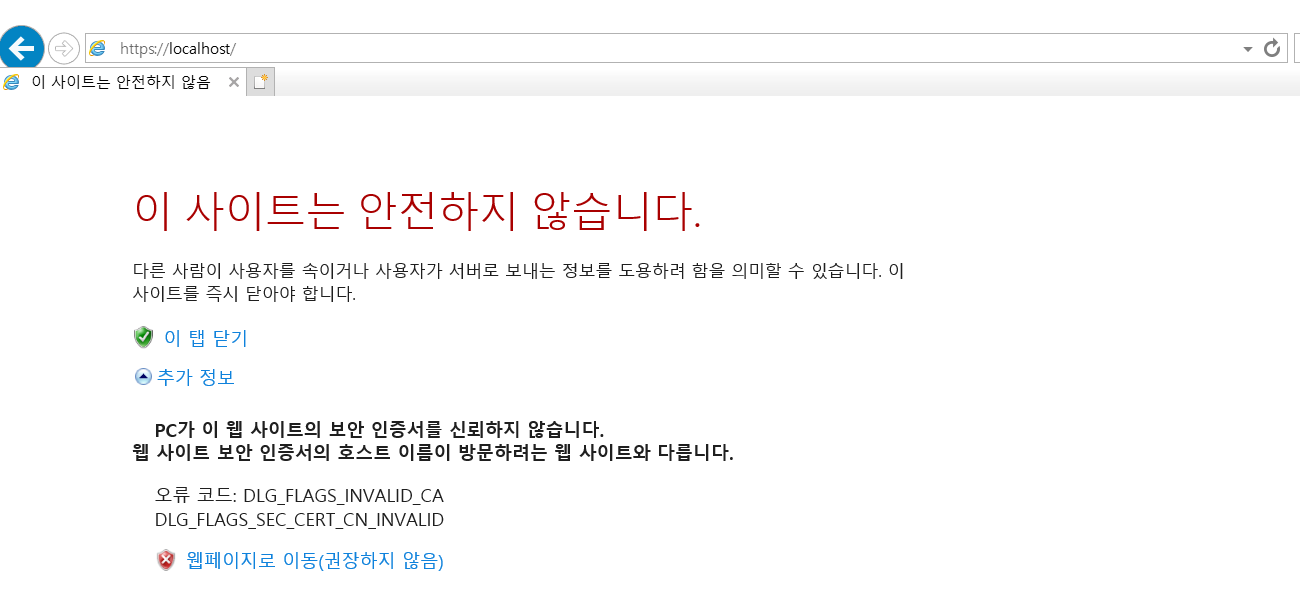
https://localhost를 주소창에 입력 후 아래와 같이 뜬다면 성공이다.
오류가 나는 이유는 인증기관에서 정식으로 발급받은 인증서가 아니기 때문이다.

아파치 톰캣 연동(SSL 설정)
사실 SSL이 설정되었다고 해서 톰캣과 연동이 복잡해지는 것은 없다.
서두에서 언급한 글에서 아파치 톰캣을 연동했다는 가정 하에 httpd-ssl.conf 파일에 <VirtualHost > 부분만 조금 수정을 해주면 된다.
httpd-ssl.conf
<VirtualHost *:443>

#   General setup for the virtual host
#DocumentRoot "${SRVROOT}/htdocs"
ServerName localhost:443
#ServerAdmin admin@example.com
ErrorLog "${SRVROOT}/logs/error.log"
TransferLog "${SRVROOT}/logs/access.log"

JkMount /* workers1

#   SSL Engine Switch:
#   Enable/Disable SSL for this virtual host.
SSLEngine on
기존에 DocumentRoot를 주석처리한다.
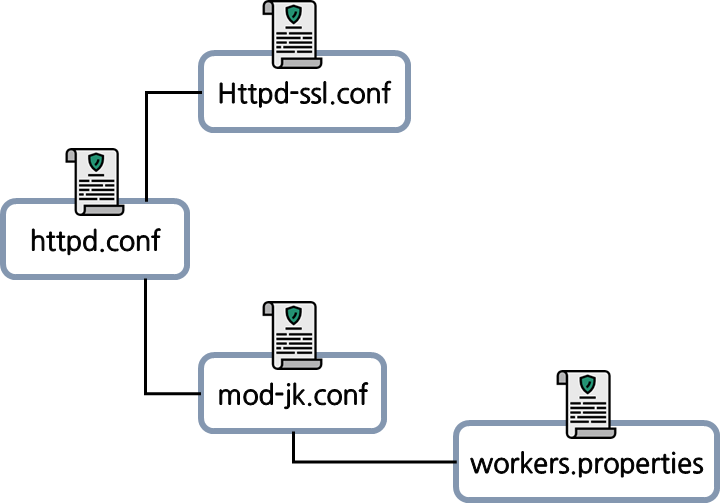
TransferLog 아래에 JkMount를 추가한다. JkMount는 아파치와 톰캣 연동시 사용한 모듈이다. 모든 url의 처리를 workers1로 보낸다.
이것이 가능한 이유는 아파치 설정 파일의 구조가 아래와 같이 연결되어 있기 때문이다.
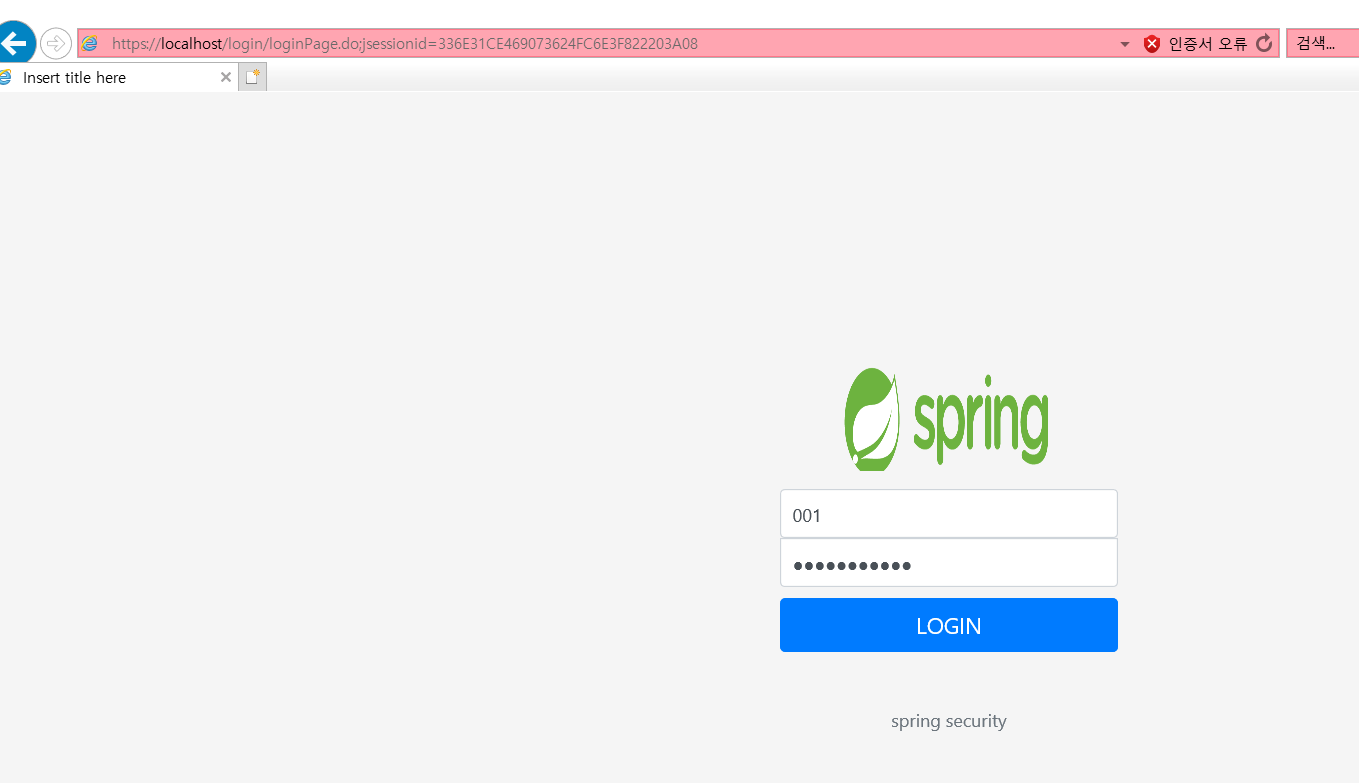
https://localhost를 주소창에 입력 후 아래와 같이 뜬다면 성공이다.
+

서버 구동에 실패한 경우 커맨드창에서 명령어로 실행하게 되면 로그를 직접 보지 않아도 에러 확인이 가능했다.
참고
+ 피드백은 언제나 환영입니다 :)
| [WAS]Tomcat 한글 깨짐(???? 현상) (1) | 2020.09.15 |
|---|---|
| [WAS]POST 방식에서 파라미터 개수 제한 (0) | 2020.05.26 |
| 아파치 톰캣 연동(Apache + Tomcat) (5) | 2020.02.03 |
| [WAS]Tomcat SSL 적용 (0) | 2020.02.03 |
| hosts 파일 (0) | 2018.12.02 |
소중한 공감 감사합니다.