새소식
반응형
1. 스프링 시큐리티 설치
지난 포스팅, "[Security]스프링 시큐리티 적용하기 - 1) 스프링 프레임워크 설정"을 하게 되면서 maven을 이용해 필요한 라이브러리를 추가할 수 있게 되었다.
1-1. 스프링 시큐리티를 사용하기 위해서 dependency를 추가한다.
(dependency에 대한 이해를 하기 위해서는 maven을 공부해야 하는데 여기서는 라이브러리의 관리를 도와주는 정도로 이해하고 넘어가자)
스프링 시큐리티 버전은 3.1 버전으로 스프링 3.9 버전과 문제 없이 잘 돌아갔으나 다른 버전에 경우 어떤 충돌 현상이 있을지는 장담하지 못할 것 같다.
pom.xml
<!-- Spring Security 사용을 위한 dependency 등록 Start -->
<dependency>
	<groupId>org.springframework.security</groupId>
	<artifactId>spring-security-core</artifactId>
	<version>3.1.0.RELEASE</version>
</dependency>
<dependency>
	<groupId>org.springframework.security</groupId>
	<artifactId>spring-security-web</artifactId>
	<version>3.1.0.RELEASE</version>
</dependency>
<dependency>
	<groupId>org.springframework.security</groupId>
	<artifactId>spring-security-config</artifactId>
	<version>3.1.0.RELEASE</version>
</dependency>
<!-- Spring Security 사용을 위한 dependency 등록 End -->
1-2. web.xml에 스프링 시큐리티 필터를 추가한다.
필터의 이름은 springSecurityFilterChain으로 약속하며, 이것은 스프링 시큐리티 내부 빈으로써 자동 생성된다.
web.xml
<!-- 스프링 시큐리티 필터 추가(DelegatingFilterProxy) -->
<filter>
	<filter-name>springSecurityFilterChain</filter-name>
	<filter-class>org.springframework.web.filter.DelegatingFilterProxy</filter-class>
</filter>
<filter-mapping>
	<filter-name>springSecurityFilterChain</filter-name>
	<url-pattern>/*</url-pattern>
</filter-mapping>
1-3. web.xml에 DispatcherServlet 설정 파일인 contextConfigLocation에 security-context.xml 파일을 추가로 등록한다.
web.xml
<context-param>
		<param-name>contextConfigLocation</param-name>
		<param-value>
		/WEB-INF/spring/root-context.xml
		/WEB-INF/spring/appServlet/security-context.xml
		</param-value>
</context-param>
최종 web.xml
<?xml version="1.0" encoding="UTF-8"?>
<web-app version="2.5" xmlns="http://java.sun.com/xml/ns/javaee"
	xmlns:xsi="http://www.w3.org/2001/XMLSchema-instance"
	xsi:schemaLocation="http://java.sun.com/xml/ns/javaee https://java.sun.com/xml/ns/javaee/web-app_2_5.xsd">

	<!-- 스프링 시큐리티 필터 추가(DelegatingFilterProxy) -->
	<filter>
        <filter-name>springSecurityFilterChain</filter-name>
        <filter-class>org.springframework.web.filter.DelegatingFilterProxy</filter-class>
    </filter>
    <filter-mapping>
        <filter-name>springSecurityFilterChain</filter-name>
        <url-pattern>/*</url-pattern>
    </filter-mapping>

	<!-- The definition of the Root Spring Container shared by all Servlets and Filters -->
	<context-param>
		<param-name>contextConfigLocation</param-name>
		<param-value>
		/WEB-INF/spring/root-context.xml
		/WEB-INF/spring/appServlet/security-context.xml
		</param-value>
	</context-param>

	<!-- Creates the Spring Container shared by all Servlets and Filters -->
	<listener>
		<listener-class>org.springframework.web.context.ContextLoaderListener</listener-class>
	</listener>

	<!-- Processes application requests -->
	<servlet>
		<servlet-name>appServlet</servlet-name>
		<servlet-class>org.springframework.web.servlet.DispatcherServlet</servlet-class>
		<init-param>
			<param-name>contextConfigLocation</param-name>
			<param-value>/WEB-INF/spring/appServlet/servlet-context.xml</param-value>
		</init-param>
		<load-on-startup>1</load-on-startup>
	</servlet>

	<servlet-mapping>
		<servlet-name>appServlet</servlet-name>
		<url-pattern>/</url-pattern>
	</servlet-mapping>
</web-app>
2. security-context.xml 파일 만들기
2-1. 스프링 시큐리티, 보안과 관련한 컨텍스트 파일을 따로 관리하기 위해 security-context.xml 파일을 만든다.
파일의 이름은 자유지만 security와 관련한 파일이기 때문에 가독성을 위해 security-context.xml로 정했다.
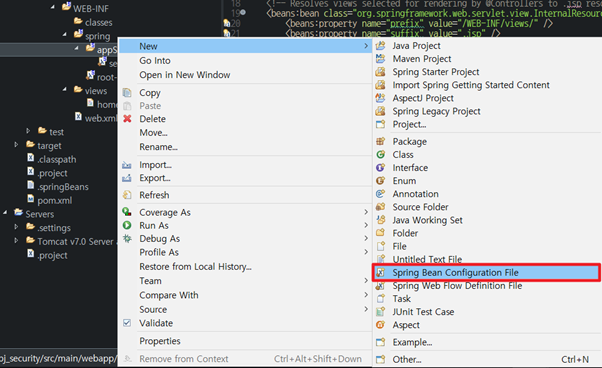
[WEB-INF]-[spring]-[appServlet] 에서 오른쪽 클릭 후 New에 Spring Bean Configuration File을 클릭한다.
2-2. 파일 이름을 입력한다.

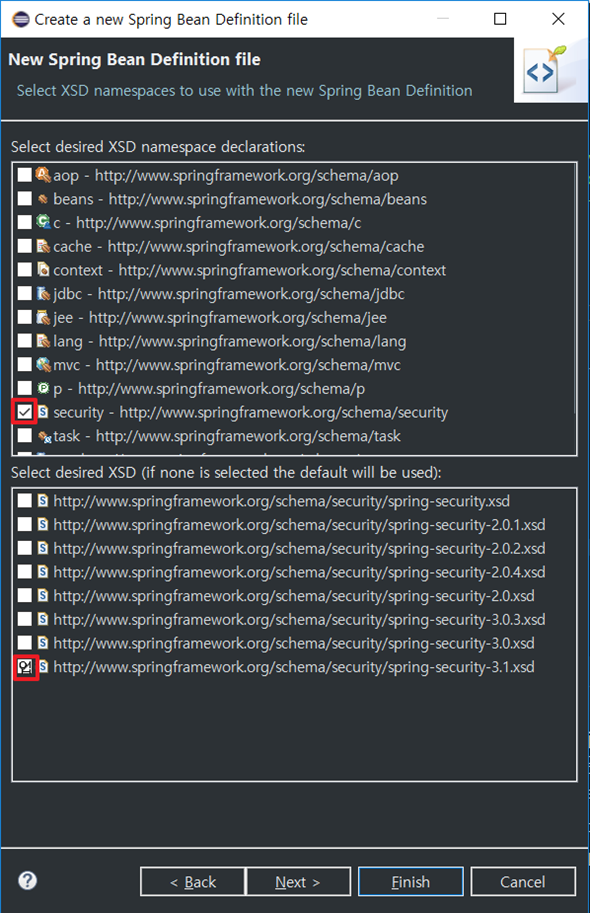
2-3. 아래 체크 박스 선택 후 넘어간다.
2-4. 스프링 빈 정의를 추가하기 위한 설정인데 finish해도 무관하다.

2-5. 파일이 만들어지면 코드를 아래와 같이 수정한다.
security-context.xml
<?xml version="1.0" encoding="UTF-8"?>
<beans:beans xmlns="http://www.springframework.org/schema/security"
    xmlns:beans="http://www.springframework.org/schema/beans" xmlns:xsi="http://www.w3.org/2001/XMLSchema-instance"
    xsi:schemaLocation="http://www.springframework.org/schema/beans
           http://www.springframework.org/schema/beans/spring-beans-3.0.xsd
           http://www.springframework.org/schema/security
           http://www.springframework.org/schema/security/spring-security-3.1.xsd">
    <http auto-config='true'>
        <intercept-url pattern="/**" access="ROLE_ADMIN" />
    </http>
    <authentication-manager>
        <authentication-provider>
            <user-service>
               <user name="admin" password="1234" authorities="ROLE_USER, ROLE_ADMIN" />
               <user name="guest" password="1234" authorities="ROLE_USER" />
               <user name="guest2" password="a1234" authorities="ROLE_USER" />
            </user-service>
        </authentication-provider>
    </authentication-manager>
</beans:beans>
<http auto-config='true'> : 스프링 시큐리티가 기본 로그인페이지를 제공해준다. 나중에 나오겠지만 로그인 페이지를 개발자 입맛에 맞게 커스텀 할 수 있다.
<intercept-url pattern=”/**” access=”ROLE_ADMIN” /> : “/**” 는 모든 디렉토리와 파일을 가르킨다. 즉, ROLE_ADMIN만 모든 디렉토리와 파일에 접근할 수 있는 권한을 가진다 의미.
<authentication-manager> : 유저들의 권한을 설정한다. <user>태그의 authorities 옵션은 해당 유저의 권한을 뜻한다. admin 유저는 ROLE_USER와 ROLE_ADMIN 권한을 갖고 있으며, guest와 guest2는 ROLE_USER 권한만 가지고 있음을 뜻한다.
권한을 설정할 땐 기본적으로 "ROLE_” 를 접두어로 붙여 사용한다. 만약 다른 네임 규칙을 정하고 싶다면 <authentication-provider> 태그 내에 role-prefix 옵션을 통해 변경할 수 있다.
3. 테스트
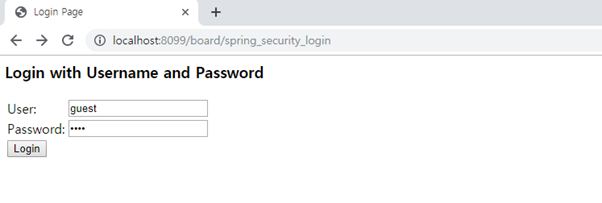
아주 간단한 스프링 시큐리티 설정이 끝났습니다. 다시 localhost:8099/board URL을 호출해보자.
아래와 같은 화면이 보인다면 성공!

ROLE_ADMIN 권한을 가지고 있는 admin 유저는 정상적으로 접속이 되지만 guest 유저는 403 페이지가 뜨면서 접근이 거부되는 것을 확인할 수 있다.


여기까지가 간단한 스프링 시큐리티 설정이며, 다음 장부터 스프링 시큐리티를 커스터 마이징하는 단계로 들어가보도록 하겠습니다. 본 포스팅을 준비하면서 배운 것은 스프링 시큐리티는 스프링 버전에 의존성을 갖기 때문에 버전으로 인한 충돌 문제가 발생할 수 있다는 것이었습니다.
+ 피드백은 언제나 환영입니다 :)
| [Spring Framework]Spring Security 적용하기 - 4) DB 연동, MyBatis 연결 (4) | 2019.10.28 |
|---|---|
| [Spring Framework]Spring Security 적용하기 - 3) 커스터마이징 (8) | 2019.10.23 |
| [Spring Framework]Spring Security 적용하기 - 1) 스프링 프레임워크 설정 (0) | 2019.10.23 |
| 싱글톤 패턴(Singleton Pattern) (1) | 2019.02.24 |
| 개방 폐쇄 원칙(OCP) (2) | 2019.02.20 |
소중한 공감 감사합니다.