새소식
반응형
스프링 시큐리티 인증 절차를 커스터마이징하는 과정을 소개합니다. 본 과정은 패스워드 암호화 작업시 반드시 필요한 작업인 것 같습니다.
전체 소스는 GitHub에서 확인하실 수 있습니다.
※ 작업환경
기존에 로그인 인증 처리는 xml 파일 설정에 의해 되고 있습니다.(<jdbc-user-service> 태그)
(변경전)security-context.xml
	<authentication-manager>
		<authentication-provider>
			<jdbc-user-service data-source-ref="dataSource"
				  users-by-username-query="SELECT USERID as username
												, PASSWORD
												, USEFLAG as enabled
											 FROM PM_USER WHERE USERID = ?"
			authorities-by-username-query="SELECT A.USERID as username
												, B.USERROLECD as authority
											 FROM PM_USER A
												, PM_AUTH B
											WHERE A.USERAUTH=B.USERAUTH
											  AND A.USERID = ?"
			/>
		</authentication-provider>
	</authentication-manager>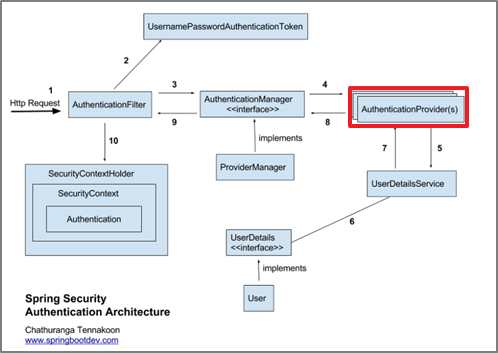
스프링 시큐리티의 인증 절차를 담당하고 있는 인터페이스가 있습니다.
바로 AuthenticationProvider 입니다.
해당 인터페이스를 구현한 구현체 클래스를 만들어 사용하면 DB에 저장되어 있는 패스워드(암호화되어 있고, 복호화는 불가능)와 로그인시 입력한 패스워드를 비교하여 인증을 처리할 수 있습니다.
AuthenticationProvider 인터페이스 구현시 기본적으로 2개의 메소드를 상속받게 됩니다.
supports 메소드는 Authentication 객체를 AuthenticationProvider가 인증 가능한 클래스인지 확인하는 역할을 합니다.
이후에는 authenticate 메소드가 실행되어 인증을 진행하게 됩니다.
인증을 성공하면 사용자의 정보와 권한을 담고 있는 Authentication 객체를 AuthenticationManager에게 리턴합니다.
AuthenticationManager는 ProviderManager로 구현되어 있습니다.


ProviderManager는 여러 개의 AuthenticationProvider에게 인증을 위임하는데 이 중 하나의 Provider에서 인증을 성공한다면 인증된 Authentication 객체를 반환합니다. 이 부분이 앞서 언급된 AuthenticationProvider 구현 클래스의 authenticate 메소드인 것이다.
이제 AuthenticationProvider 인터페이스를 구현하여 로그인 인증을 커스터마이징 해보겠습니다.
먼저 사용자 정보를 담고 있는 인터페이스를 구현하고 7개의 메소드를 상속받게 됩니다.
이후 DB에서 사용자 정보를 불러와 UserDetails 구현 클래스에 담아줄 것이다.
package com.planm.security;

import java.util.ArrayList;
import java.util.Collection;

import org.springframework.security.core.GrantedAuthority;
import org.springframework.security.core.authority.SimpleGrantedAuthority;
import org.springframework.security.core.userdetails.UserDetails;

public class CustomUserDetails implements UserDetails {

	private String USERNAME;	//사용자 고유 ID
	private String PASSWORD;	//암호화 PW
	private String AUTHORITY;	//사용자 권한
	private String ENABLED;		//계정 활성화 여부

	@Override
	public Collection<? extends GrantedAuthority> getAuthorities() {
		ArrayList<GrantedAuthority> auth = new ArrayList<GrantedAuthority>();
		auth.add(new SimpleGrantedAuthority(this.AUTHORITY));

		return auth;
	}

	@Override
	public String getPassword() {
		return PASSWORD;
	}
	public void setPASSWORD(String pASSWORD) {
		this.PASSWORD = pASSWORD;
	}
	public void setAUTHORITY(String aUTHORITY) {
		this.AUTHORITY = aUTHORITY;
	}
	@Override
	public boolean isEnabled() {
		System.out.println(ENABLED);
		return "1".equals(ENABLED) ? true : false;
	}
	public void setENABLED(String eNABLED) {
		this.ENABLED = eNABLED;
	}
	@Override
	public String getUsername() {
		return USERNAME;
	}
	public void setUsername(String uSERNAME) {
		this.USERNAME = uSERNAME;
	}

	@Override
	public boolean isAccountNonExpired() {
		return true;
	}
	@Override
	public boolean isAccountNonLocked() {
		return true;
	}
	@Override
	public boolean isCredentialsNonExpired() {
		return true;
	}

}
package com.planm.login.dao;

import java.util.Map;

import org.apache.ibatis.session.SqlSession;
import org.springframework.beans.factory.annotation.Autowired;
import org.springframework.stereotype.Repository;

import com.planm.login.vo.LoginVO;

@Repository("LoginDao")
public class LoginDao {

	@Autowired
	private SqlSession mybatis;

	public Map<String, Object> getUserDetail(String userid) {
		return mybatis.selectOne("login.getUserDetail", userid);
	}


}
loginMapper.xml
<select id="getUserDetail" resultType="LowerKeyMap">
		<![CDATA[
			/*
			 * SQL-ID      : login.getUserDetail
			 * Description : 사용자 인증시 사용될 정보
		     * Create date : 2021.08.03
		     */
		]]>
		<![CDATA[
			SELECT USERID	  AS USERNAME
				 , PASSWORD
				 , USEFLAG    AS ENABLED
				 , USERROLECD AS AUTHORITY
			  FROM PM_USER A
			  	 , PM_AUTH B
			 WHERE A.USERID   = #{userid}
			   AND A.USERAUTH = B.USERAUTH
		]]>
</select>
UserDetailsService는 DB에 있는 사용자 정보를 불러오는 인터페이스로 해당 인터페이스를 구현하여 사용합니다. 아래 메소드를 상속받아 구현합니다.
이 메소드에서 위에서 만든 LoginDao를 주입(@Autowired)하여 사용자 정보를 입력합니다. 그리고 UserDetails 구현 클래스인 CustomUserDetails로 저장합니다.
package com.planm.security;

import java.util.Map;

import org.springframework.beans.factory.annotation.Autowired;
import org.springframework.security.core.userdetails.UserDetails;
import org.springframework.security.core.userdetails.UserDetailsService;
import org.springframework.security.core.userdetails.UsernameNotFoundException;

import com.planm.login.dao.LoginDao;

public class CustomUserDetailsService implements UserDetailsService {

	@Autowired
	private LoginDao loginDao;

	@Override
	public UserDetails loadUserByUsername(String userid) throws UsernameNotFoundException {
		Map<String, Object> map = loginDao.getUserDetail(userid);

		String username  = (String) map.get("username");
		String password  = (String) map.get("password");
		String enabled   = (String) map.get("enabled");
		String authority = (String) map.get("authority");

		CustomUserDetails userDetail = new CustomUserDetails();

		userDetail.setUsername(username);
		userDetail.setPASSWORD(password);
		userDetail.setENABLED(enabled);
		userDetail.setAUTHORITY(authority);

		return userDetail;
	}
}이제 실제 인증을 처리하게될 AuthenticationProvider의 구현 클래스를 만듭니다.
getEncodePassword(String password) 메소드는 입력받은 비밀번호를 암호화해 리턴하는 기능을 합니다. Spring Security에서 제공해주는 PasswordEncoder가 아닌 자체 암호화 알고리즘을 사용했습니다. 암호화에는 해시 함수를 사용한 단방향 암호화로 SHA2를 사용했습니다.(참고)
이후에는 암호화된 패스워드와 DB에 저장된 패스워드(CustomUserDetailsService에서 저장된 사용자 정보)를 비교하는 작업이 이루어집니다.
package com.planm.login.dao;

import java.util.Map;

import org.apache.ibatis.session.SqlSession;
import org.springframework.beans.factory.annotation.Autowired;
import org.springframework.stereotype.Repository;

import com.planm.login.vo.LoginVO;

@Repository("LoginDao")
public class LoginDao {

	@Autowired
	private SqlSession mybatis;

	public Map<String, Object> getUserDetail(String userid) {
		return mybatis.selectOne("login.getUserDetail", userid);
	}

	public String getEncodePassword(String password) {
		return mybatis.selectOne("login.getEncodePassword", password);
	}
}
package com.planm.security;
import org.springframework.beans.factory.annotation.Autowired;
import org.springframework.security.authentication.AccountExpiredException;
import org.springframework.security.authentication.AuthenticationProvider;
import org.springframework.security.authentication.BadCredentialsException;
import org.springframework.security.authentication.CredentialsExpiredException;
import org.springframework.security.authentication.DisabledException;
import org.springframework.security.authentication.LockedException;
import org.springframework.security.authentication.UsernamePasswordAuthenticationToken;
import org.springframework.security.core.Authentication;
import org.springframework.security.core.AuthenticationException;
import com.planm.login.dao.LoginDao;
import com.util.CommonUtil;
public class CustomAuthenticationProvider implements AuthenticationProvider {
@Autowired
private LoginDao loginDao;
@Autowired
private CustomUserDetailsService userDetailsService;
@Override
public Authentication authenticate(Authentication authentication) throws AuthenticationException {
String userid = (String) authentication.getPrincipal();
String password = (String) authentication.getCredentials();
String encodePassword = (String) loginDao.getEncodePassword(password);
CustomUserDetails userDetails = (CustomUserDetails) userDetailsService.loadUserByUsername(userid);
String signPassword = userDetails.getPassword();
if(CommonUtil.isNull(userDetails) || (!encodePassword.equals(signPassword))) { //ID,PW 틀린 경우 OR 계정이 없는 경우
throw new BadCredentialsException(userid);
} else if(!userDetails.isAccountNonLocked()) { //계정이 잠긴 경우(true로 고정, 추후 옵션처리 가능)
throw new LockedException(userid);
} else if(!userDetails.isEnabled()) { //계정이 비활성화된 경우
throw new DisabledException(userid);
} else if(!userDetails.isAccountNonExpired()) { //계정이 만료된 경우
throw new AccountExpiredException(userid);
} else if(!userDetails.isCredentialsNonExpired()) { //비밀번호가 만료된 경우
throw new CredentialsExpiredException(userid);
}
userDetails.setPASSWORD("");
Authentication newAuth = new UsernamePasswordAuthenticationToken(userDetails, null, userDetails.getAuthorities());
return newAuth;
}
@Override
public boolean supports(Class<?> authentication) {
return authentication.equals(UsernamePasswordAuthenticationToken.class);
}
}
이제 AuthenticationProvider를 구현한 클래스 CustomAuthenticationProvider를 등록합니다.
LoginDao 사용을 위해 component-scan도 등록해주었습니다.
security-context.xml
	<context:component-scan base-package="com.planm.login.dao"></context:component-scan>

	<!-- AuthenticationProvider custom -->
	<beans:bean id="customAuthenticationProvider" class="com.planm.security.CustomAuthenticationProvider" />

	<!-- UserDetailsService custom -->
	<beans:bean id="userService" class="com.planm.security.CustomUserDetailsService" />

	<authentication-manager>
		<authentication-provider ref="customAuthenticationProvider">
		</authentication-provider>
	</authentication-manager>
참고자료
Spring Security - 인증 절차 인터페이스 구현 (2) AuthenticationProvider
AuthenticationProvider 인터페이스는 화면에서 입력한 로그인 정보와 DB에서 가져온 사용자의 정보를 비교해주는 인터페이스이다. 해당 인터페이스에 오버라이드되는 authenticate() 메서드는 화면에
to-dy.tistory.com
스프링 Security_로그인_암호화된 DB 패스워드로 인증 [6/9]
- Develop OS : Windows10 Ent, 64bit - WEB/WAS Server : Tomcat v9.0 - DBMS : MySQL 5.7.29 for Linux (Docker) - Language : JAVA 1.8 (JDK 1.8) - Framwork : Spring 3.1.1 Release - Build Tool : Maven 3.6..
codevang.tistory.com
Authentication
서블릿 기반 어플리케이션에 적용할 수 있는 스프링 시큐리티 인증을 설명합니다. 공식 문서에 있는 “authentication” 챕터를 한글로 번역한 문서입니다.
godekdls.github.io
+ 피드백은 언제나 환영입니다 :)
| [Sprinig Boot]Apache POI를 이용한 워드 다루기 (0) | 2021.09.13 |
|---|---|
| [JUnit]JNDI 설정시 단위테스트 (0) | 2021.08.23 |
| [Spring Framework]AOP를 이용한 Log 기록하기 (0) | 2021.02.21 |
| [AOP]Transaction 설정 (0) | 2021.02.17 |
| [Spring Framework]Lucy-xss-filter-servlet 적용하기 (1) | 2021.02.09 |
소중한 공감 감사합니다.